Tuesday, September 14, 2010
Zoo visit
This Friday the class will be going to the Zoo for a field trip to sketch animals. We will meet at AI in our usual place and time (room 160- 8am) to sign permission slips and take roll before heading out to the zoo at 845am. Please be on time to class! If you do not show up to class and sign the permission slip before we leave, you will not be allowed to go with us. This is AI policy. Bring sunscreen, water, your drawing supplies, and a hat to keep the sun off.
Sunday, September 12, 2010
Final Book
Dzu -
Does the final book need to have our creature and humanoid redesigns in it as well?
- Noah
Key Landmarks
Hey Dzu,
Could you make a list of the key landmarks for the body/legs/arms that we should look for?
Could you make a list of the key landmarks for the body/legs/arms that we should look for?
Thursday, September 9, 2010
Week 9 anouncements
Tomorrow is IDEA survey day so please try your best NOT to miss class. We will be covering the rear legs/hindquarters and going over homework and grades. Also, tomorrow is the last day to withdraw from the class so I will be talking to each one of you about your current grades going into the last two weeks.
Thursday, August 12, 2010
Skeleton Muscle Diagrams
Dzu -
Is there any possible way you could add a 4th diagram to the skeleton - "inside"? I'm looking at the leg and my understanding is that the iliotibial band goes down the outside - what does the inside leg look like? Same band, or something different?
- Noah
Monday, August 9, 2010
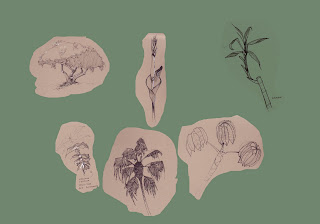
Scanning and cleanup
Here's a process you can use to clean up your scans for the final book you are required to make.
1) Scan in and cut out your best sketches. Figure out the layout and format you want for the final book. You can go landscape, portrait, etc. Just don't make the book too small. Scan in everything at 300 dpi so you get as much quality as possible. Put each sketch on it's own separate layer in Photoshop.
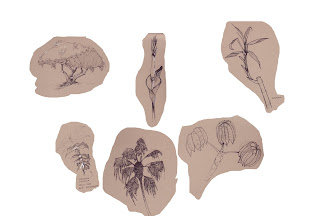
2) For each sketch/layer we want to remove the background color and keep just the line work. The easiest way is to use Image > Adjustments > Replace Color. In the Replacement box, adjust the Lightness slider to the far right. Now use the eye dropper and click on the background color. You should see the background color turn to white. Keep clicking on the background color until you have the most white and least noise. Erase out any noise. If you need to, adjust levels to correct any contrast problems.
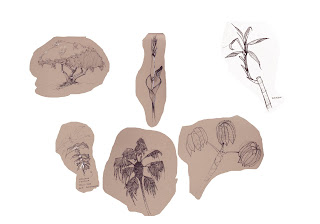
3) Repeat the cleanup steps for every sketch on your page. Turn the blending mode to Multiply for each sketch/layer. With everything set to Multiply, you can change the Background color from the default white to any color or use a photo texture.


Subscribe to:
Posts (Atom)